Example 1: Bovine Pancreatic Trypsin Inhibitor (BPTI)
The Input Configuration
The psfgen user manual is a necessary resource for learning how to use psfgen to generate PDB and PSF input files for NAMD. A simple example in that manual is a solvation of bovine pancreatic trypsin inhibitor (BPTI) starting from its PDB coordinates (PDB ID 6pti). pestifer can reproduce this solvation via the input YAML-format configuration shown below:
# Author: Cameron F. Abrams, <cfa22@drexel.edu>
#
# pestifer input script
#
# Simple build of solvated BPTI (mimics psfgen user manual)
#
# Notes:
#   - The phospate ion and all crystal waters are retained
#   - A five-phase NPT equilibration is used to settle the density
#   - A production tarball is generated: prod_6pti.tgz
#
title: Bovine Pancreatic Trypsin Inhibitor (BPTI)
tasks:
  - fetch:
      sourceID: 6pti
  - psfgen:
  - validate:
      tests:
        - residue_test:
            name: CYS residues present
            selection: resname CYS
            measure: residue_count
            value: 6
  - md:
      ensemble: minimize
  - solvate:
  - md:
      ensemble: minimize
  - md:
      ensemble: NVT
      nsteps: 400
  - md:
      ensemble: NPT
      nsteps: 200
  - md:
      ensemble: NPT
      nsteps: 400
  - md:
      ensemble: NPT
      nsteps: 800
  - md:
      ensemble: NPT
      nsteps: 1600
  - md:
      ensemble: NPT
      nsteps: 13200
  - mdplot:
      timeseries:
        - density
        - - cpu_time
          - wall_time
      units:
        cpu_time: s
        wall_time: s
      basename: solvated
      grid: True
  - terminate:
      basename: my_6pti
      artifacts: artifacts
      package:
        basename: prod_6pti
        namd:
          ensemble: NPT
Step |
Task |
Details |
|---|---|---|
1 |
|
|
2 |
|
standard build |
3 |
|
1 test(s) |
4 |
|
minimize |
5 |
|
water box |
6 |
|
minimize → NVT (400 steps) → NPT (16,200 steps, 5 phases) |
7 |
|
equilibration time-series plots → |
8 |
|
basename: |
You can check the Configuration File Reference for a complete reference to Pestifer config files.
This build can be performed (preferably in a clean directory) using this command:
$ pestifer build-example 1
The first thing pestifer does with build-example is to copy the YAML config file for that example into the local directory. In this case, the file copied is named bpti1.yaml, and contains what you see above. Or, alternatively, pasting that content into a local file myconfig.yaml:
$ pestifer build myconfig.yaml
Alternatively, you could also use fetch-example to get the config file and then run it:
$ ls
$ pestifer fetch-example 1
$ ls
bpti1.yaml
$ pestifer build bpti1
(If there is no extension on the argument of build, pestifer assumes one of .yaml, .yml, or .ym.)
bpti1.yaml is a YAML-format text file, and the keywords (of course) have particular meanings. This is also an example of a “minimal” configuration file; pestifer has many more controls that can be set in a configuration file than are shown here. Here, this configuration file contains two topmost directives: title and tasks. The value of title is the string Bovine Pancreatic Trypsin Inhibitor (BPTI) and the value of tasks is a list. Each element in the list of tasks is itself a directive describing a task, and pestifer in general executes tasks in the order they appear in the tasks list.
Digression: Interactive Help
pestifer uses the general-purpose package ycleptic (pypi) to manage its input configurations. A package developer using ycleptic specifies a “pattern” file describing the configuration file syntax they would like their package to have. ycleptic provides two useful features:
Automatic generaton of a hierarchical arrangement of RST files for documentation of all configuration parameters; in these pages, this is rooted at Configuration File Reference.
Automatic acquisition of a command-line interactive help feature that allows package users to explore the configuration file format specified by the package developers.
Let’s use this second feature to explore the fetch task. (You can visit the tasks page to view the same info in the online documentation.)
$ pestifer --no-banner config-help tasks

  tasks:
      Specifies the tasks to be performed serially in a pestifer run

  base|tasks
      fetch ->
      continuation ->
      psfgen ->
      ligate ->
      pdb2pqr ->
      mdplot ->
      cleave ->
      domainswap ->
      solvate ->
      desolvate ->
      ring_check ->
      make_membrane_system ->
      md ->
      manipulate ->
      terminate ->
      validate ->
      .. up
      ! quit
  pestifer-help:  fetch

  fetch:
      Fetch task; its only job is to fetch any external data file (e.g.,
      PDB).

  base|tasks->fetch
      source
      sourceID
      source_format
      .. up
      ! quit
  pestifer-help: source

  source:
      Source for the initial coordinate file; one of 'pdb' (for the RCSB
      PDB), 'alphafold' (for the AlphaFold DB), or 'local' (for a
      local file)
      default: pdb

  All subattributes at the same level as 'source':

  base|tasks->fetch
      source
      sourceID
      source_format
      .. up
      ! quit
  pestifer-help: sourceID

  sourceID:
      ID of the source file; if source is 'local', a file 'sourceID.pdb' or
      'sourceID.cif' must exist in the working directory

  All subattributes at the same level as 'sourceID':

  base|tasks->fetch
      source
      sourceID
      source_format
      .. up
      ! quit
  pestifer-help: source_format

  source_format:
      Format of the source file; this should be 'pdb' or 'cif'
      default: pdb
      allowed values: pdb, cif

  All subattributes at the same level as 'source_format':

  base|tasks->fetch
      source
      sourceID
      source_format
      .. up
      ! quit
  pestifer-help: !
$
In the config file for this example, we specify on the the sourceID as 6pti; the other source attributes take their default values. This causes pestifer to fetch the file 6pti.pdb from the RCSB PDB (if 6pti.pdb does not already exist in the current working directory).
We can return to config-help to explore the psfgen task, which is the next task in the list. We can do this by:
And so on. Let’s return to the example. Immediately after the psfgen task we declare an md task, and the subdirective ensemble is set to minimize. There are no other subdirectives explicitly listed. This task will use namd3 to run an energy minimization. Let’s have a look at the possible subdirectives for an md task. We can do this by:
$ pestifer console-help tasks md

  md:
      Parameters controlling a NAMD run

  base|tasks->md
      cpu-override
      vacuum
      ensemble
      minimize
      nsteps
      dcdfreq
      xstfreq
      temperature
      pressure
      addl_paramfiles
      other_parameters
      constraints ->
      .. up
      ! quit
  pestifer-help:
The Input Configuration (Continued)
So let’s return to the example. After the first md task is the solvate task. Notice that it has no subdirectives; in this case default values are used for any subdirectives. After this task has finished, we have a run-ready nonequilibrated system. We equilibrate here using first another minimization via an md task, then an NVT equilibration in another md task, and then a series of progressively longer NPT equilibrations in yet more md tasks. These “chained-together” NPT runs avoid the common issue that, after solvation, the density of the initial water box is a bit too low, so under pressure control the volume shrinks. It can shrink so quickly that NAMD’s internal data structures for distributing the computational load among processing units becomes invalid, which causes NAMD to die. The easiest way to reset those internal data structures is just to restart NAMD from the result of the previous run.
The mdplot task generates a plot of system density (in g/cc) vs time step for the series of MD simulations that occur after solvation. If you are monitoring a run in real time, this file will be called solvated-density.png. This is a quick way to check that enough NPT equilibration has been performed. For this example, the plot looks like this:
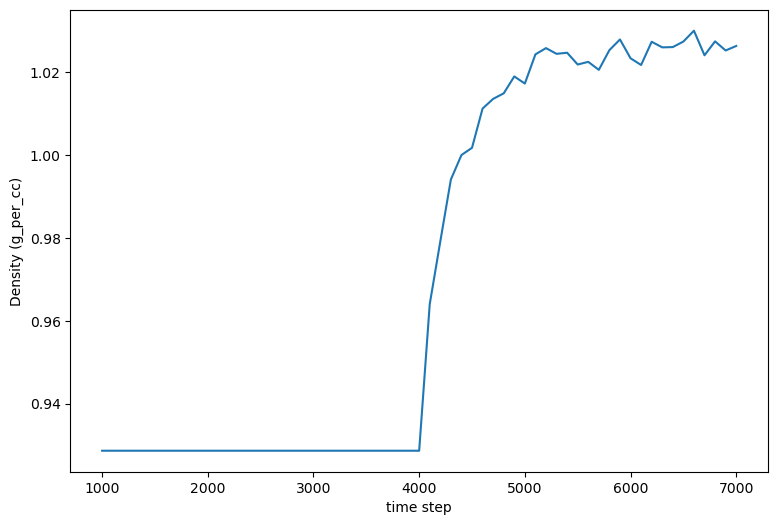
Density vs. timestep for the BPTI system post-solvation.
Since the density has plateaued, we can reasonably assume that the system density is equilibrated.
Finally, we see a terminate task, whose main role is to generate some informative output and to provide a set of NAMD input files (PSF, PDB, xsc, coor, and vel) that all have a common base file name. The package subdirective creates a tarball <basename>.tar.gz containing all input files necessary to execute a NAMD run, ready for transfer to the HPC resource of your choice. The md attribute of pestifer allows you to specify any NAMD configuration options you’d like in the production NAMD config file; here, we merely state that we want the default NAMD parameters for an NPT run. The state_dir attribute is the name of a directory you would like to prepend to all files in this tarball; here the default value my_state is used.
By default, the terminate task also archives all other working files from the build in another tarball called artifacts.tar.gz. The artifacts_dir is a prepended directory name for the files in that tarball. (The PNG images of any plots generated by an mdplot task can be found in this tarball.)
Listing the contents of the state tarball:
$ tar ztf my_6pti.tar.gz
 my_state/my_6pti.psf
 my_state/my_6pti.pdb
 my_state/my_6pti.coor
 my_state/my_6pti.xsc
 my_state/my_6pti.vel
 my_state/prod_6pti.namd
 my_state/par_all36m_prot.prm
 my_state/par_all36_lipid.prm
 my_state/par_all36_carb.prm
 my_state/par_all36_na.prm
 my_state/par_all36_cgenff.prm
 my_state/par_all36m_prot.prm
 my_state/par_all36_lipid.prm
 my_state/par_all36_carb.prm
 my_state/par_all36_na.prm
 my_state/par_all36_cgenff.prm
 my_state/toppar_water_ions.str
 my_state/toppar_all36_carb_glycopeptide.str
 my_state/toppar_all36_prot_modify_res.str
 my_state/toppar_water_ions.str
 my_state/toppar_all36_carb_glycopeptide.str
 my_state/toppar_all36_prot_modify_res.str
 my_state/toppar_all36_moreions.str
You should note the presence of CHARMM force-field files in the current directory. These are generated by pestifer during the build, and are essentially copies of the parent files with certain lines commented out to permit use by VMD and NAMD. The parent files are not altered.
The archive tarball contains all intermediate files used in the build but which are not necessary for production MD runs. These files can be useful for debugging or for understanding the build process.
Digression: On File Name Conventions
Intermediate files generated by pestifer during a build typically conform to a common naming convention:
CC-MT-ST-TASKNAME.ext
Here CC is the 2-digit identification of the run controller (e.g., 00 for the first controller), MT is the 2-digit identification of the main task of that controller (e.g., 02 is the third task), and ST is the 2-digit identification of the subtask of that task(e.g., 00 for the first subtasks). TASKNAME is the name of the task as it appears in the yaml file. ext is the file extension. For example, 00-02-00_solvate.psf is the PSF file generated by the solvate task (the third task) in this example.
Some tasks may spawn subcontrollers, which typically acquire a controller ID derived from that of the parent controller. In the current version of pestifer, this occurs when building a membrane bilayer, in which a series of MD simulations are launched by a subcontroller the the make_membrane_system task.